If you aren’t a yogi, the title of this post will seem quite odd! Nail a crow? No. Let the crow be.
For those of us on the journey to the self, by the self and through the self we are all too familiar with this challenging and rewarding pose which is the baseline entry point to those amazing arm stands everyone is sharing on Pinterest and the first learned pose where yogis can actually “fly.”
Crow pose (Kakasana) involves balancing on the hands with the shins resting on the backs of the upper arms and the feet are lifted into the air – and it is not easy to master people! It has literally taken me the better part of a year of regular practice to feel comfortable in this pose and even now I can really only hold it for about 15 seconds.
Mastering this pose requires patience, humility, strength, focus, and courage, making it an incredibly challenging and rewarding experience full of important life lessons.
In this post, I’ll share what I did to prepare my body and build strength as I worked up to crow pose, and my tips for finally nailing it.
Prep work
You may already have the forearm, wrist, and core strength required to nail this pose, but if you’re having trouble you need to go back to these building blocks as you work up your strength and flexibility.
Downward dog
Downward dog was very helpful in building wrist strength. This is a staple pose for many flows for a reason! In addition to all the great benefits, an inversion pose has to offer this is also a critical building block for many more advanced asanas.
This was probably the most important piece for building that upper body strength. Add in some super slow chaturangas to your daily routine and try holding the pose as long as you can.
One of my amazing yoga instructors also introduced me to reverse chaturanga which is an extremely challenging strength builder. It involves going from cobra back down into chaturanga without touching hips or knees to the floor. Again, the slower the better here, and hollllldd.
Dolphin
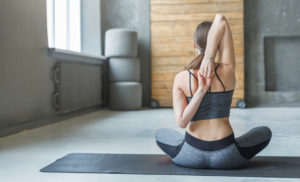
Dolphin pose is another great upper body strength builder specifically toning the shoulders. This is no joke, it will help you develop super-strong shoulders.
Forearm stand
I am still working on perfecting my forearm headstand, I currently use a wall for support. Even with this modified version, it is still a great pose for building upper body and shoulder strength.
Boat pose / the hundred
I used boat pose to build core strength and infused a little pilates into my routine with the hundred.
To do the hundred, get into boat pose and stretch your legs out in front of you. Draw your belly button in and up while pulling your ribs inward. Stretch your arms out straight toward your feet, palms facing down. Pump your arms up and down working up to one hundred pumps.
You can also try my 10-Minute Upper Body Yoga Blast to build upper body strength.
Baby crow
I went through a period where I had been consistently practicing these poses but still wasn’t quite ready for crow when I discovered baby crow. It’s a great in-between pose that helps you get used to balancing on your arms while building additional upper body and core strength you will need to progress.
Begin in a sitting position on your knees. Open your knees and place your forearms on the mat in front of you while keeping your shins still on the floor curling your back into a “C.” Your forearms should be as directly under your body as possible as they will hold your weight. Prop your weight up onto your toes and forearms, then using your upper body and core strength, do your best to press into the mat with your forearms and palms to see if you can lift your toes and legs off the ground to support your body on your forearms. You may not be able to lift very high or even off the mat at all and that’s ok! The point is to challenge your body and build that strength up.
Once you start to feel more confident in these prep poses, you can move on to trying crow with some modifications.
Crow modifications
The single best modification I used when learning crow was using a yoga bolster to protect my face from falling flat on the floor in front of me. Not gonna lie, this happened plenty of times too and no, it wasn’t too bad definitely nothing to be afraid of. By using a bolster you can protect your face though and even prop yourself back again to try to regain balance. I started with the bolster standing on its tall side so I could practically rest my forehead right on it in full crow.
Another modification you can try is a yoga bolster or block under your toes to slowly work up your balance and get the feel of where your body should sit in the air.
That’s really it for modifications, beyond the support a bolster or block can provide, you just have to go for it!
Tips for nailing crow pose
Here, I will share with you my best tips for nailing that crow pose.
1. Use a thin mat, or skip the mat entirely. I get that this sounds scary with a balancing pose but less cushioning underneath your palms will help you balance better.
2. Keep your head looking forward. I felt most natural-looking straight down at the mat or even tucking my chin, but by cocking your head forward almost as if you were looking straight up and the sky if you were standing you will balance easier. The weight of your head will help you offset the weight behind your arms.
3. Keep your hips high. This makes the pose more of a balance challenge than a strength game.
4. Place your palms on the mat so that your fingers are spread wide and almost angled outward from each other at about a 45-degree angle. I find this positioning is most comfortable on my wrists and helps me balance. The point here is that the positioning of your palms and fingers matters for this pose, and you may need to try a few different positions to see what works best for you.
5. Distribute your weight through your palms all the way to your fingertips. This helps to protect your wrists and improves your balance.
6. Practice rocking. With your hands on the mat in front of you as you prepare to enter crow, try rocking back and forward on your hands instead of fully trying to freeze in a balance.
7. Have no fear. When you’re ready to go for it, you need to really go for it with confidence and just do the scary thing. Allow yourself to glide forward onto your hands! Again, having a bolster or even just a pillow set on the floor in front of you can be just the trick to really improve that confidence. Going fully into the pose is surprisingly easier than all of the ways I tried to make it easier like tapping my toes or keeping my toes close to the mat should I need them or only gliding forward a little bit. Just go for it and fly baby!
After I was really able to hold this pose for the first time, it was only like four seconds, but it felt amazing. It’s a long road for many to be able to achieve this pose, but it is so worth it for the strength you will build, the confidence it will give you and the lessons you will learn along the way.
I hope these tips will be helpful to you as you pursue crow pose. I want to know, what works for you? Leave your tips in the comments.
Thank you and namaste.
Photo by Elly Fairytale from Pexels
If you aren’t a yogi, the title of this post will seem quite odd! Nail a crow? No. Let the crow be. For those of us on the journey to the… Read More